Milind Borkar – Expert Security Consultant
An often-overlooked critical component in video surveillance systems is the lens. The security industry has moved steadily toward providing cameras with integrated lenses taking out the ‘guess work’ for integrators. Given the increased competitive pressures, it is understandable that cameras companies make trade-offs in lens performance to meet budgetary price targets for dome and bullet offerings. This can result in less-than-ideal solutions to specific imaging tasks.
Most camera companies still offer traditional box cameras that come without a lens or with the ability to remove the accompanying lens and replace it with a better, more tailored solution. Being able to select a compatible high-performance lens can ensure the investment in a high resolution system is not wasted.
The following two case studies tell a story of lens selection gone wrong, and right. Through this story we will illustrate some of the most important considerations in lens selection. Both cases are from the public school sector. Both schools had defined goals, both did research, evaluation and testing of the selected lenses before installation. Yet one project failed, while the other was a success. What made the difference?
Case study 1 New Jersey High School
The school described their problem as a safety issue. They had unacceptable aggressive student physical behavior they did not want to escalate into violence, as well as some limited theft. They thought that an improved video surveillance system would help with deterrence as well as post event response. Their existing video surveillance system was composed of analog cameras they considered ‘high resolution,’ but not high enough resolution for use with wide angle lenses that they felt would cost effectively meet their coverage needs. They did not have or wish to have PTZ cameras as they had limited staff and would not have enough time to control and monitor such equipment. The goals they identified included having forensic quality identification at entry and exit points, people recognition in parking lots, and forensic quality identification in an unusually shaped hexagonal central hallway.
The school security staff conducted an extensive online search for products to meet their needs. They felt that upgrading to megapixel cameras would provide them higher image resolution and still allow them to use wide angle lenses to cover wide areas. They looked for megapixel cameras and did a comparison of numerous camera brands, models, and features. They discovered that not all megapixel cameras could meet their needs.
In addition, they researched wide angle lenses looking for coverage of their wide areas; they consulted local integrators for advice. They evaluated lens samples from 4 manufacturers. They found most wide-angle lenses they tested presented a severe fisheye effect. And to their surprise they found that some of the lenses tested resulted in a fuzzy, or ‘blurry image,’ even when using a 5 megapixel camera.
After the research and evaluation, they selected two 8-megapixel, 360-degree multi-sensor cameras, one for the cafeteria and another for the computer lab. They also selected thirty-four 5-megapixel cameras, 11 of which were outdoor domes, 6 were indoor domes, and another 17 were 5” indoor domes.
They chose eighteen 25-degree horizontal field of view lenses, and eight 90-degree lenses. In addition, they selected twelve 135-degree horizontal field of view, low fisheye distortion lenses from Theia Technologies – six to cover their hexagonal hallway, two to cover the parking lot and an open field area, two covering the corners of building wings, one covering the front entry, and one more covering 2 temporary buildings.
They achieved the results expected when the project came in 30% under budget, they were able to achieve what they considered great resolution with the selected equipment in the designated placements, with excellent image fluidity, and fast response time. The administration was fully satisfied and planned to upgrade other schools in the district as well.
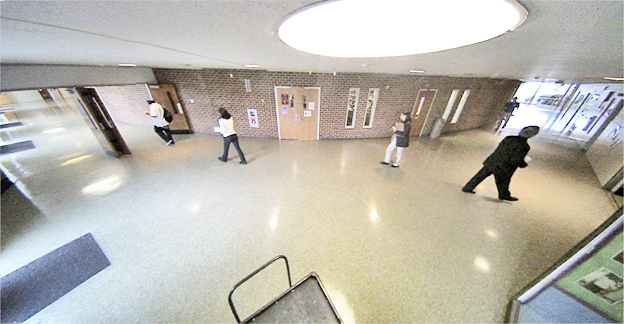
The unique hexagonal hallway in the New Jersey school was a challenge. According to the school district project manager, “Every installer we contacted said the angles were way too aggressive in the ring and wanted us to double our cameras and halve the angles at the very least.
The same for the parking lots. We did the math, and we knew the new 5-megapixel camera could pull it off, we just had to find a lens that could prove them all wrong. We went searching and the only thing that met our specs was the Theia lens. Jaws dropped when they saw the pictures. Not only did we get the massively wide angles we needed, but we did it without the fisheye everyone told us was impossible to avoid, and every single dot in the 5.1million pixel image is fully utilized and warp-free. The combination of the 5-megapixel cameras and the 5-megapixel Theia lenses provided the resolution they expected. You can tell if someone is holding a pencil.”
Case study 2 Southern California High School
Similar to the problems outlined in the New Jersey high school, the safety of students and staff was the primary concern for the administration at the California high school. Their existing video surveillance system consisted of 170 analog cameras. The system did not provide enough resolution for wide angle lenses and a legally acceptable description of individuals. They also suffered from poor system reliability, with frequent breakdowns and down time. In addition, the system was complex and costly to maintain and monitor.
As to be expected, the administration’s goals were to achieve greater spatial coverage than with their existing analog system, improved image clarity, increased system uptime, and a more manageable system size. With a new system they expected to be able to zoom in to get legally acceptable descriptions of individuals from 60 to 70 feet away and have wide and continuous coverage; they also did not want any PTZ cameras.
Their approach was a little different. The school district hired a consultant to design a system to meet their needs. The consultant met with the school to understand their needs, selected the equipment, sought the advice of manufacturers, and conducted testing.
The consultant specified the system, reducing the camera count from 170 analog cameras to forty-three megapixel cameras with forty-three wide angle, low distortion, 5-megapixel lenses, also from Theia Technologies.
The result: the cameras and lenses were purchased, installed, and shortly thereafter the lenses were returned. What went wrong?
What went wrong? Enter the CSI effect
As powerful as megapixel cameras combined with megapixel lenses can be, there are physical limitations of the technologies that popular shows such as CSI ignore, resulting in the creation of unrealistic expectations. There is an undeniable temptation to believe that with a megapixel camera and megapixel lens, anything is possible.
Image Resolution versus Field of View
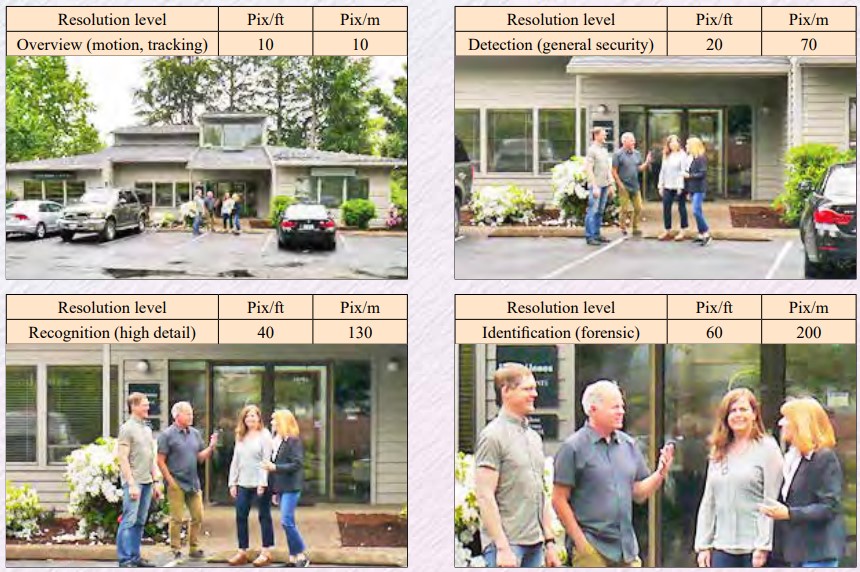
One important, but often neglected consideration is the trade-off between image resolution and field of view. With any given combination of camera and lens, the native resolution from the camera is spread over the entire field of view of the lens, affecting pixel density and image resolution. The wider the resolution is spread, the lower the pixel density. The images below, taken with the same camera from the same distance away, illustrate this trade-off. The widest field of view allows you to cover the widest area, but does not allow you to see high detail, while the narrowest field of view permits capture of high detail, but at the expense of wide area coverage.
One Size Does Not Fit All
Another important consideration in systems design is tailoring, understanding the specific needs and using the right equipment to meet those needs. Both the California and New Jersey schools recognized the need for different resolution at different locations. And yet equipment selected for the new California school system reflected a ‘one size fits all approach.’ This was a major fault of the system design which caused the return of the lenses. After installation, it was discovered that the school administration had expected not only to be able to cover the wide parking lot, but also zoom in to see license plates and identify faces at a distance. In this situation a combination of lenses, a wide angle lens for coverage, and a narrower one covering entry and exit points with high detail, could have been used in combination to accomplish both tasks.
A more tailored approach to equipment selection might take longer, in terms of research and testing, and may also mean losing volume discounts achieved through buying units in larger quantities. But the annoyance, time, expense, downtime and safety risk of installing, then ripping out the incorrect equipment and re-installing the correct equipment will be saved.
Use Available Tools
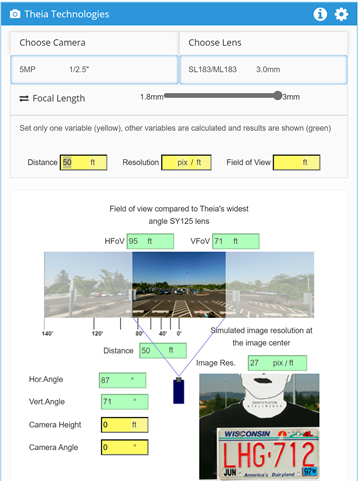
There are many useful tools available to help support systems design and correct equipment selection. One of those is Theia’s own award-winning Image Resolution Simulator and Lens Calculator. This tool will help you understand what to expect from different lens-camera combinations. You input your application variables such as camera resolution and sensor size, focal length and distance from the object and the tool returns an image that represents what you can expect to get with your combination of equipment and assumptions. It can help you determine if you have enough image detail to meet the needs of your application such as enough pixels/ foot to read a license plate or a wide enough field of view to cover your scene.
For example, you indicate you plan to use a 5 megapixel, 1/ 2.5” sensor camera, a 3mm lens, and you will be 50 feet away from your subject. The tool will calculate your pixel density, in this case 27 pixels/ foot and coverage width, in this case 97 feet wide. The tool then provides an image that represents the level of image resolution you would get for your selected variables, allowing you to quickly see if you have enough resolution to meet the needs of your application.
Do I Need a Megapixel Lens?
Pairing the lens performance with the sensor and pixel size is critical. High resolution sensors are usually not much larger than those used for HD cameras, but their pixel count is significantly higher and the pixel sizes are necessarily much smaller, making the lens’ requirement to resolve the small pixels crucial.
While a typical HD sensor is 1/2.8” in size with 2.9 micron-sized pixels, one 4K sensor is 1/2.3” in size, with 1.45 micron-sized pixels – 50% smaller pixels. One might be tempted to pair the higher resolution cameras with a lens that covers a similar sized but lower resolution sensor. While the lenses required to physically cover both image sensors are similar, the resolving capability required of the higher resolution lenses to pair with the smaller pixel sized sensors is much greater.
In testing, the New Jersey high school determined that using a standard resolution lens with a 5-megapixel camera produced a blurry image. Most often if you want to take advantage of all the pixels a multi megapixel camera provides, a high-quality lens with matching resolution is needed, otherwise the money spent on a high-resolution camera is wasted.
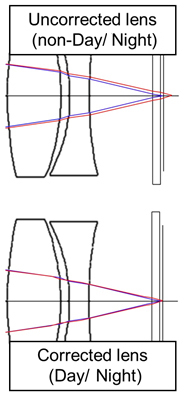
When using a megapixel camera it is important that the spot size of the focal plane of the lens used be comparable in size or smaller than the pixel size of the camera, otherwise the light falls off the pixel resulting in a fuzzy image. The spot size is the area where the lens focuses rays of light as illustrated in the images below.
A megapixel lens requires more elements, more complex shaped and higher precision elements such as aspheres, making them more difficult to manufacture and more costly to purchase.
In megapixel cameras the pixel size and the required lens spot size varies depending on the size of sensor and quantity of pixels it contains. You can have 2 different cameras, both 1.3 megapixel, but if the sensor size is not the same, the pixel size will be different. The figure below illustrates this.
In selecting a lens it is important to choose one that is designed for use with the same sensor size or smaller and designated to match or be higher than the megapixel rating of the camera.
Beyond that, not all megapixel rated lenses are created equal and the task of selecting a megapixel lens is complex. For more detailed information about this, refer to the whitepaper found at this link. Why do I need a Megapixel lens?
Do I need a Day/ Night Lens?
In the two school case studies, Theia’s SY125 lens was used. The SY125 lens is not a Day/ Night or IR corrected. Was the lens selection correct? The answer is, it depends.
A Day/ Night, or IR corrected lens maintains focus when light from the Infrared (IR) spectrum is present. Usually lenses are designed and focused in the visible spectrum light range. If they are not IR corrected, when light from the IR spectrum is introduced, there is a focus shift, or defocus resulting in a fuzzy image.
Sunlight, streetlights (except fluorescents), and IR LED illuminators for invisible illumination are sources of IR light. When using a lens in naturally occurring IR light, when introducing IR illumination artificially with illuminators, and when using a Day/ Night cameras which remove the IR blocking, or IR cut filter at night allowing IR light to hit the sensor, an IR corrected, or Day/ Night lens is required.
IR corrected lenses are specially designed to be able to focus visible spectrum light and IR spectrum light to the same focal plane. This requires a more complex lens design with often more lens elements, more complex shaped elements such as aspheres, as well as special coatings.
Do Your Homework
As illustrated with these 2 cases, it is critical to not only research the system equipment, its features and benefits, but it is just as important to understand the needs of your application, keeping in mind that these will vary by location, and may even be in conflict and require trade-offs to meet those needs.
After understanding the needs and goals of the applications and system, and researching the equipment for each location, then use tools to calculate if the selected equipment will do what you believe it should. Once this is done, verify the equipment will actually work by evaluating the products in the actual application. Manufacturers often provide for evaluation of equipment prior to installation, especially for large projects to confirm the homework that’s been done.
In summary
- Define your needs in detail for each location/ application.
- Remember the lens in the beginning.
- Understand Needs vs. Wants, and identify trade-offs.
- Don’t ignore in-house firsthand experience.
- Seek advice of experts – consultants, manufacturers, integrators.
- Don’t over-engineer just because you can (CSI effect).
- Research & use tools available (calculators, design tools).
- Test technical solutions in real situation to the extent possible.
- Remember the budget, but don’t be penny-wise and pound foolish.
As is the case with most things, investing the time up front will save time and money in the long run.
*Views expressed in the article are solely of the Author